Thursday, September 10, 2020

Creating with Joy Clair Stamps


Hello and welcome to my blog!


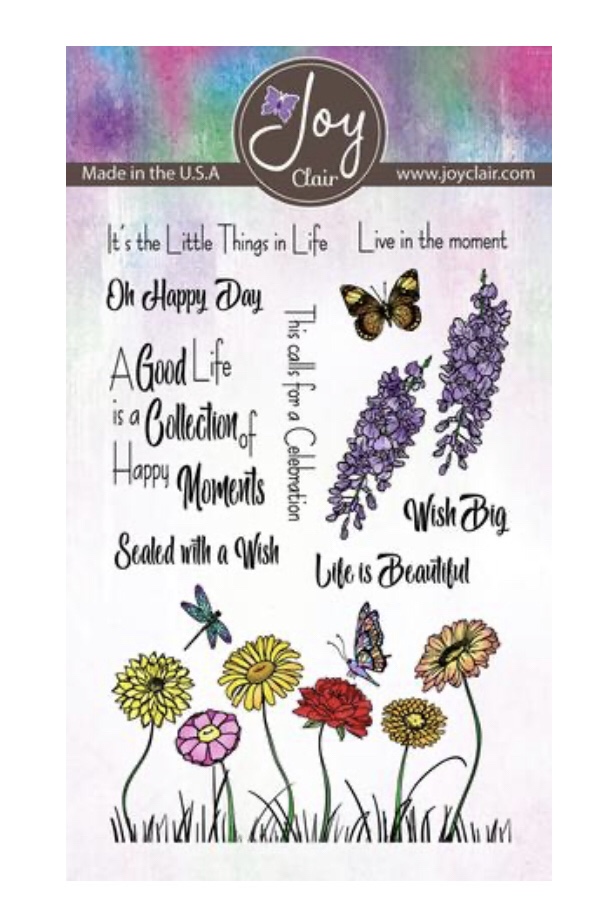
I had a lot of fun creating with two stamp sets from Joy Clair Designs.  Unfortunately, the second set I used, Little Monsters, is sold out.  I really loved the card, so I decided to keep it in the blog.  The first card I am showcasing is from the Wish Big stamp set which is one of my favorites!


I decided to make a slimline card so I used the Loopy Rectangle Die by Gina Marie Designs (which can be found at joyclair.com) to cut out two difference panels.  I used the two largest dies to cut out the panels.  I cut the smaller panel using white card stock and the larger panel using yellow card stock. I used a piece of low tack tape on the bottom of the smaller panel to keep the stamped image from going out of the stitched area.  I stamped the sentiment and flowers with black ink and embossed them with clear embossing powder.  I stamped the flowers again on copy paper and cut a mask for the flowers so I could make the sky background.  I used a cloud stencil from my stash to make the background. I colored the flowers with Copic Markers.  I glued the smaller panel to the larger yellow panel and glued that to a white slimline card base, measuring 8 3/4 inches by 3 3/4 inches.  I sprayed the card with a glitter mist and added sequins for a little bling.  Slimline cards are all the rage right now and they fit nicely in a business size envelope!


The second card I used is an A2 card. 


I used a white piece of 80 pound card stock cut to 4 1/4 inches by 5 1/2 inches.  I stamped the monster images with black ink and heat embossed them with clear embossing powder.  I  also stamped the sentiment on a scrap piece of white card stock and heat embossed it.  I stamped the words on the background in a medium grey ink. I colored the monsters with Copic Markers and used a glimmer pen to make them sparkle.    I cut out the sentiment out and glued that to a black piece of cardstock.  I popped it up with foam tape.  I die cut the panel with a die from my stash, glued that to piece of black card stock cut slightly smaller than the white A2 card.  I glued this panel to the card base and accented the card with black NUVO drops. 

I really enjoyed making these cards.  I have linked the first stamp set below. 


Thank you for taking the time to check out my blog.  Please make sure you follow Joy Clair's Facebook PageColor by Faith Bible Journaling Facebook Page, Instagram, and Twitter.  Joy Clair also has a YouTube Channel and Pinterest Page. You can find great inspiration on any of these sites.

I hope you have time to check out this great stamp set and all the other crafty goodness at Joy Clair. Joy Clair is also carrying lots of fun dies and stencils.  If you have any questions, please feel free to comment below or email me at lindahpd@aol  Stay safe and stay well!


Happy Creating,

Linda

Tuesday, August 25, 2020

Make a Wish!


Hello everyone! 

Welcome to my blog!  It certainly is hard to believe that it is almost the end of August.  Where did the summer go?  Today I am showcasing the Make A Wish Digital Stamp Set from Joy Clair Designs.  This set is so versatile!  I have seen it used on the popular slimline cards a lot, so today I wanted to make an A2 size card with it.  This could be used for any celebration!!!


To make this card, I started out with an alcohol ink blended panel from my stash cut to 4 inches by 5 1/4 inches.  I printed the digital stamp on 80# card stock.  I cut the present image in half  so I could stack them on top of each other.  I used a gold metallic pen to color in the ribbons and bows on the presents.  I fussy cut the balloons, watercolored them, and used a gold shimmer pen to make them shine. I cut out the celebrate sentiment. I glued the back row of presents to the panel then popped up the front row of presents with foam tape.  I drew in a few lines to make it look like the presents were all complete with a thin line marker.  I glued the sentiment to the top, popped up one of the balloons over part of the sentiment, and glued the other two balloons below it.  I drew in the strings to the balloons with my black marker. I then glued this panel to a white  A2 card base.  This card will be great for any celebration.  All I have to do is write my message inside and mail it.  I love having cards on hand in my stash. 

Digital stamps are so fun to work with and take up no room at all in your crafty space. I have linked this stamp set below.


Make A Wish


Thank you for taking the time to check out my blog.  Please make sure you follow Joy Clair's Facebook PageColor by Faith Bible Journaling Facebook Page, Instagram, and Twitter.  Joy Clair also has a YouTube Channel and Pinterest Page. You can find great inspiration on any of these sites.

I hope you have time to check out this great stamp set and all the other crafty goodness at Joy Clair. Joy Clair is also carrying lots of fun dies and stencils.  If you have any questions, please feel free to comment below or email me at lindahpd@aol  Stay safe and stay well!


Enjoy the last days of summer!

Happy creating,

Linda


Monday, August 10, 2020

Fun with Floral Friendship by Joy Clair Designs


Hello and welcome!

It is hard to believe it is August already.  The time seems to be going by so quickly.  I wanted to take time and enjoy the flowers.  Today I am showcasing the Floral Friendship Digital Stamp Set from Joy Clair's August release.  This set contains four beautiful flowers and four perfect sentiments.


To make this card I ink blended a piece of white card stock in the rainbow order.  I cut it out with a slimline die from my stash.  I glued this to a piece of glitter card stock cut to the same size as the die cut. The frame cut separately from the diagonal piece, so I turned it in the opposite direction for  an added  touch.  I fussy cut two flower images and two sentiments out from the set.  I loosely colored this images with Copic Markers to give them a whimsical look.  You can see this in the picture below.


I glued the flowers to the middle of the card and the sentiments on the top and bottom.This divided the card into thirds, which is more visibly appealing to the eye.  I cut a white card base to 7 1/2 inches by 8 3/4 inches, folded it in half, and glued the decorated panel to it.  Since the card was on a glitter card stock, I felt it was busy enough so I did not add any extra embellishments.  I love how this turned out.  If you don't have a slimline die to use, just cut out the rainbow blended piece and adhere the flowers on it.  That would look beautiful too!

I have linked this great digital stamp set below.


Floral Friendship


Thank you for taking the time to check out my blog.  Please make sure you follow Joy Clair's Facebook PageColor by Faith Bible Journaling Facebook Page, Instagram, and Twitter.  Joy Clair also has a YouTube Channel and Pinterest Page. You can find great inspiration on any of these sites.

I hope you have time to check out this great new release and all the other crafty goodness at Joy Clair.  If you have any questions, please feel free to comment below or email me at lindahpd@aol  Stay safe and stay well!

Take time to smell the flowers before summer is over!

Happy creating,

Linda

Friday, July 31, 2020

Joy Clair's New Release Featuring Pencil Me Digital Stamp Set

Hello Everyone!

Welcome to the Joy Clair New Release!  Today I will be featuring one of my favorite digital stamps from the new release called "Pencil Me".  I made two cards using this fun new set.  My blog is part of a hop and there will be a GIVEAWAY.   


Pencil Me


Here is my first card featuring "Pencil Me" Digital Stamp Set.


To make this slimline card, I cut a piece of white card stock measuring 3 1/2 inches by 8 1/2 inches.  I cut a piece of thin writing paper from a child's writing tablet.  I glued this thin paper to the white card stock.  I printed out the digital stamp and colored all the partial pencils with Copic Markers.  I fussy cut the pencils out separately along with the sentiment and complete pencil.  I arranged the pencils along the top of the writing paper in rainbow order and glued them to the paper.  I fussy cut a piece of rainbow paper from my stash to fit inside the complete pencil, a piece to frame the sentiment, and a piece measuring 4 inches by 9 inches to layer on my card base.  I glued the complete pencil pointing toward the sentiment and popped up the sentiment with foam tape.  I cut a piece of black card stock a 1/4 inch larger the the writing paper.  I layered the writing paper to the black card stock and then to the rainbow paper.  I cut a white card base, measuring 8 1/2 inches by 9 1/4 inches and folded it in half. This made the card base 4 1/4 inches by 9 1/4 inches.  I added colorful sequins and used a sparkle pen on all of the crayons.  There are many different sizes being used for the slimline cards.  I make sure mine will fit in an A10 or business size envelope.


My second card is an A2 size card.


To make this card, I used the same items from the first card.  I cut a white piece of card stock with a die from my stash.  I glued that to an A2 rainbow paper and then glued this to an A2 white card base.  I colored the pencils with Copic Markers and formed then into a circle in the middle of the card.  I cut out the circle shape, colored it using rainbow order, and glued the small sentiment in the middle.  I popped this up in the middle of the crayons with foam tape.  I popped the sentiment up with foam tape and glued it near the bottom of the card.  I used sparkle pen on all the crayons.  Sequins were added for extra sparkle and a small heart from my stash was added to the sentiment on the bottom.

Don't forget about the GIVEAWAY.  Check out everyone's great creations for a chance to win!  All you have to do to enter to win is to leave a comment answering the question below:


You have until Sunday, August 2nd at 11:59 pm EST to post a comment and be to eligible to win one of the two $15.00 gift cards from Joy Clair Designs, valid for stamps and Digital Sets. Only one comment per person please.  Two randomly selected winners will be announced on Joy Clair Designs Blog on August 12th.  Thank you for joining Joy Clair Designs August New Release Blog Hops and best of luck with the contest!


Thank you for taking the time to check out my blog.  Please make sure you follow Joy Clair's Facebook PageColor by Faith Bible Journaling Facebook Page, Instagram, and Twitter.  Joy Clair also has a YouTube Channel and Pinterest Page. You can find great inspiration on any of these sites.


I hope you have time to check out this great new release and all the other crafty goodness at Joy Clair.  If you have any questions, please feel free to comment below or email me at lindahpd@aol  Stay safe and stay well!

Good Luck!

Stay Safe.  Stay Well.

Happy creating,

Linda


You are invited to the Inlinkz link party!
Click here to enter

Monday, July 27, 2020

Christmas in July with Joy Clair


Welcome Everyone,

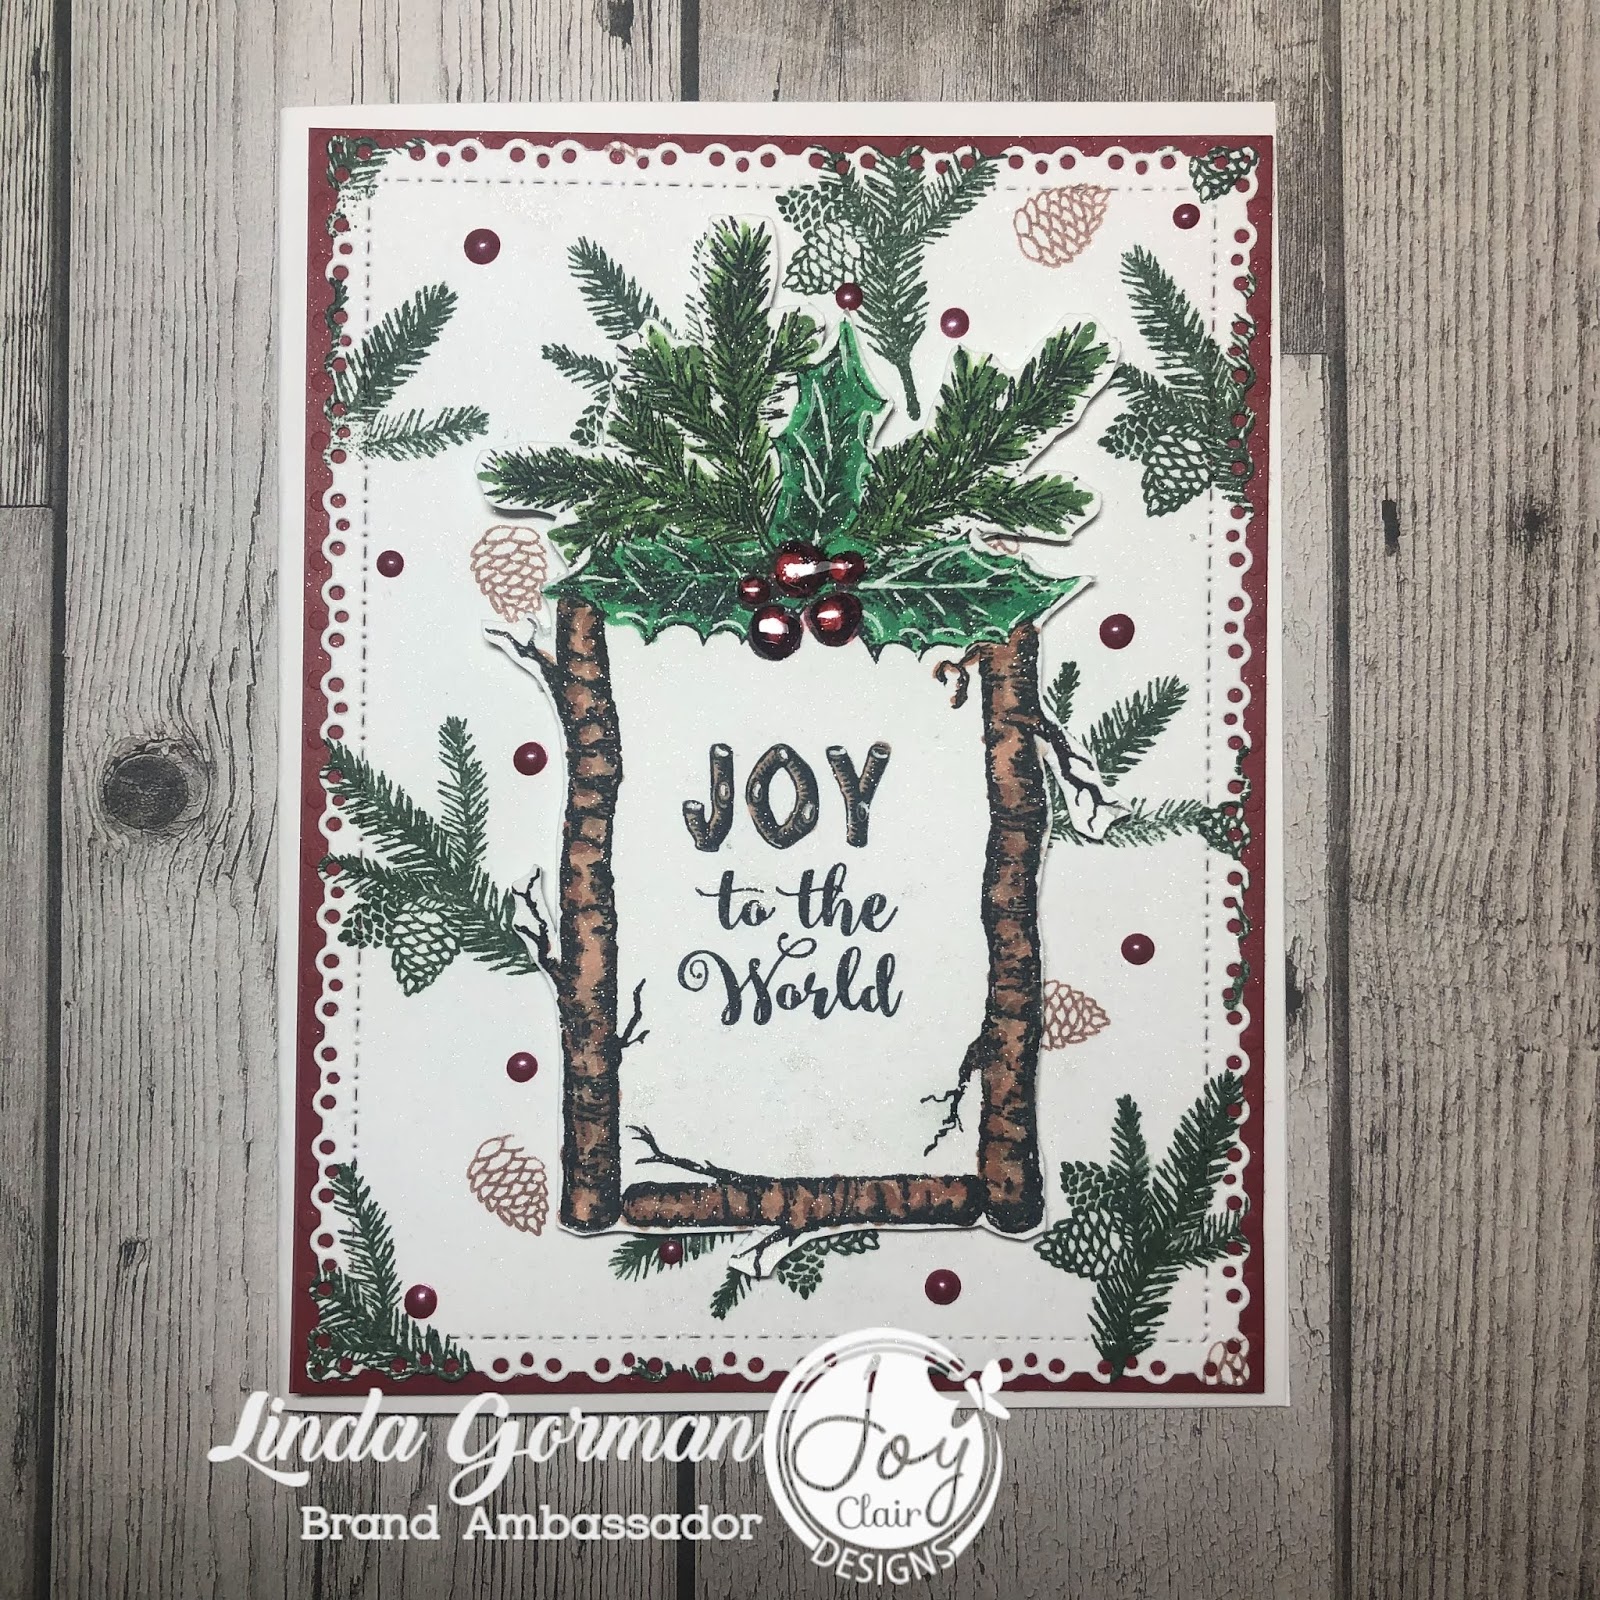
Today is the wrap up of Christmas in July with Joy Clair. I hope you have had time to check out the great products and great prices available.  I created two similar cards for today. I think it is fun to try and think of many ways to use one or two stamp sets.  Both cards are made with the Rustic Christmas and Rustic Sentiment Stamp Sets, which can be purchased in a bundle for a great price or they can be purchased separately.


Rustic Bundle


 Here is the first card I made.


To make this card, I cut a piece of white card stock  to 4 1/4 inches x 5 1/2 inches.  I used the pine bough with the pine cone and one of the separate pine cones to make my background  I stamped the bough in green ink and the separate pine cone with brown ink.  I die cut this panel with the largest of the Pleated Lace Rectangle Dies. On a scrap piece of white card stock I stamped the holly and pine bough, I also stamped it again on masking paper to make a mask for it.  I then masked the bough out and stamped the rustic frame over it so looked like the bough was on top of the frame.  I stamped the sentiment in the middle of the frame.  I colored the bough and frame with Copic markers and fussy cut it out. I popped it up with foam tape and place it in the center of the background panel.  I glued the panel to a piece of red card stock slightly smaller than an A2 card base.  I place this onto a white A2 card base.  I added red NUVO drops to the background and Glossy Accents to the berries on the holly.  I always wait until the card is on the card base and then add the embellishments.  If not, you take a chance of smearing them (which I have done before). 

The second card.


This card was made the same way as the first card, except I used kraft card stock and when I made the background, I used black ink on the pine boughs and did not use the separate pine cone.  **A helpful tip is to save your mask, and you can use it several times before you have to make another one.  I usually stick it to the back of the stamp set. 

The products available at Joy Clair for these cards have been linked in the card descriptions.  If you want to check out other cards visit the Joy Clair Blog.  Everything in the store is 20% off except last call, stencils and dies until July 28, use TEAMTINY20 at checkout.  

Thank you for taking the time to check out my blog.  Please make sure you follow Joy Clair's Facebook PageColor by Faith Bible Journaling Facebook Page, Instagram, and Twitter.  Joy Clair also has a YouTube Channel and Pinterest Page. You can find great inspiration on any of these sites.

I hope you have time to check out this great deal and all the other crafty goodness at Joy Clair.  If you have any questions, please feel free to comment below or email me at lindahpd@aol  Stay safe and stay well!


Merry Christmas in July!!!


Happy Creating, 

Linda

Thursday, July 9, 2020

Joy Clair Christmas in July


Hello everyone and welcome to Christmas in July!  Every Thursday in July, Joy Clair will be celebrating Christmas.  Today the celebration is the stamp bundle below. 


To celebrate this event, I created a Christmas card using the Rustic Christmas Stamp Set from the bundle. 


To create this card, I started with an alcohol inked background from my stash.  I die cut the snowflake overlay with the Snowflake Coverplate Die by Gina Marie Designs,which is also available from Joy Clair Designs.  I die cut the snowflake coverplate using a white glitter piece of card stock.  I sprayed the back of the die cut with spray adhesive and glued it to the inked background.  I stamped the frame and sentiment from the Rustic Christmas stamp set onto white card stock.  I colored the frame and inside the "merry" with Copic Markers.  I cut the image out with my Scan-n-Cut.  I popped the image up with foam squares and adhered it to the middle of the card.  I used gold NUVO drops to accent the snowflakes and the image.  I set this aside to dry.  After everything was dry, I adhered the piece to a brown A2 card base.  I love using non-traditional colors for Christmas!  It is always fun to get a head start on making your Holiday Cards!!! This stamp set is very versatile and works perfectly with the Rustic Sentiments Stamp Set!  What a great bundle!!!


Thank you for taking the time to check out my blog.  Please make sure you follow Joy Clair's Facebook PageColor by Faith Bible Journaling Facebook Page, Instagram, and Twitter.  Joy Clair also has a YouTube Channel and Pinterest Page. You can find great inspiration on any of these sites.

I hope you have time to check out this great deal and all the other crafty goodness at Joy Clair.  If you have any questions, please feel free to comment below or email me at lindahpd@aol  Stay safe and stay well!


Happy Creating, 

Linda

Wednesday, July 1, 2020

Joy Clair New Release Featuring Big Hugs Stamp Set


Hello Everyone!

Welcome to Day 2 of the Joy Clair New Release.  Today, I am featuring the new Big Hugs stamp set.  I love this stamp set!  So many ways and occasions to use it with!!!  I made two cards with this set.


My first card, I die cut a piece of white card stock with a frame die from my stash and also die cut a grey piece of card stock one size bigger.  I ink blended the background by dragging my ink pads across the card stock.  I love the way this turned out!  I used the digital stamp for this card.  I colored the images with Copic Markers and fussy cut them out.  I popped up the dog with foam tape and placed him on the card.  I placed the bones and puppy paws around the dog.  I used a gold sticker strip to ground the dog.  I glued this piece to the larger die cut grey piece.  I placed this onto an A2 white card base.  I accented the dog bones and puppy paws with Glossy Accents and sprinkled them with glitter while they were wet.  I fussy cut the sentiments and glued one to the top of the card and one to the bottom of the card.  I added black Nuvo drops and let them dry.


To make this second card, I cut a piece of white card stock to 3 3/4 inches by 5 inches.  I used the Fish Net Stencil with green glitter gel and let it dry.  I then offset the stencil and ink blended the rest of the background.  Make sure you mask off the area so your background comes out crisp..Don't forget to rinse your stencil and other tools right away after using the glitter gel.  I printed the digital image on 80# white card stock, colored it with Copic Markers and fussy cut it out along with the sentiment.  I popped up the dog with foam tape and placed it onto the stenciled piece.  I used two silver frames from my stash and placed them around the dog.  I glued the sentiment to the bottom.  I glued the stenciled piece to black card stock and glued this to an A2 white card base.  I love how this turned out!

Be sure to check at the new stamps sets at Joy Clair Designs. Don't forget to look at the dies and stencils too!  You have the choice of buying the clear stamp set or a digital stamp set, or both!!!


Thank you for taking the time to check out my blog.  Please make sure you follow Joy Clair's Facebook PageColor by Faith Bible Journaling Facebook Page, Instagram, and Twitter.  Joy Clair also has a YouTube Channel and Pinterest Page. You can find great inspiration on any of these sites.

I hope you have a chance to look at this fun, new stamp sets. if you have any questions, please leave a comment below or  email me at lindahpd@aol.   Have a great day!  Stay safe.  Stay well!


Happy Creating!

Linda